Wednesday, June 30, 2010

Travel Planning for Artists

Painting at my first Paint-Out
(I took too much stuff)

     Whatever you do and wherever you go this summer the key phrase is Pack Light. Take only what you actually need; pack only what you will actually wear or use because there are all sorts of problems in store for those who overpack.
     The airlines are charging extra for each suitcase and the limitations on weight are being watched with an eagle eye. But even more importantly, taking too much stuff just in case you need it will weight you down in many ways. You are the one responsible for carrying your suitcase and if you don't find it easy to handle along with your hand luggage/laptop/purse you may be in for an unpleasant surprise when you're asked to haul everything up 2 or 3 sets of stairs, on and off trains, from one terminal to another, or from your car to your second story motel room.
     I took way too many small bags on our recent road trip... a small suitcase, my laptop, purse, camera case, and tote bag of art supplies, plus we had a couple of food bags. All that stuff created unnecessary misery for both of us even when we could back the car up to the motel door. I'll never do that again. If I can't get everything into one suitcase and one tote bag it isn't going. If I need something that I didn't pack I can buy it or get creative with what I have. And I've found that too many articles of clothing usually isn't the problem because I wear the same garments over and over ... it's all the rest of what I take, "just in case", especially art supplies.

     In this month's Daniel Smith newsletter you'll find a useful list of painting supplies for travel.

     Elizabeth St. Hilaire Nelson wrote several posts about packing her collage supplies in her RV, here, here, and here.

       John Lovett posted his Traveling Art Material List here, here, and here.

     There's a link in my sidebar to an article I once wrote about packing clothing for travel. This may help if choosing a travel wardrobe is an issue.

Friday, June 25, 2010

Summer Garden

I've done very little in the studio this week, other than reading email and favorite blogs, in favor of spending my days in the garden. My son is doing the heavy work of digging and lifting and hauling. I sure do appreciate his expertise.

My job was cleaning moss off teak furniture and applying a sealer to try to get another year or two out of it. Our high humidity causes furniture left in the yard to rot from the ground up. But roses thrive here in Portland, The City of Roses, as you see above. That's my only rose and I'll take care of it as long as it rewards me with blooms like this.

I had a few of these broken concrete test blocks left over from another project and my son surprised me one day with a short edging made by sinking the blocks halfway into the soil:


He's hauled and placed 1 1/2 units of garden compost to mulch the beds and 3 yards of gravel to dress the paths as you see here on both sides of this flat stone that bridges the water feature at the top:


My favorite chair has its own place at the bottom of the garden next to a little pond, and no, I don't really spend much time sitting there, not as much as I'd like. I stay too busy to sit still very long.


These red cedars give us privacy at the top of the yard. I know someone will ask about the blue things... Last winter when our maples were pruned I salvaged some of the larger branches and spray painted them and placed them in several places here and there to add some color to the winter garden. People smile. Maybe they like them or just maybe they think I'm a bit wacky.


The triangular structure (center right) is the balcony outside my studio door, one of my favorite features of our home. Thanks Ted.

Wednesday, June 23, 2010

Making Journals from Scratch, continued

Studio Journals

“When you bind an art journal do you paint your pages before you bind the book or after it’s bound?”


Pages can be prepared either way. If you like the experience of opening a fresh journal with pristine white pages then go ahead and bind the paper into a book format using whatever binding structure you want… or skip the binding step and buy a blank book. My first art journals were blank coil bound books  but once I learned that I could choose my own paper and bind it myself that’s what I’ve done, (pictured above). I especially like gutting an old book that’s no longer useful and adding my own signatures using a good paper. There are lots of books, YouTube videos, and online tutorials/ classes that will walk you through the process.

My first self-bound art books were made following Teesha’s instructions here.

Other times, especially when I’m making a theme journal I’ll paint a few pages of a good paper and then tear it down and bind it as a coverless book. One such book is Teesha Moore’s 16 page journal.
 
I have a large stash of paper that has watercolor or acrylic paint on one side that I worked on in a class or as experiments that didn't come to completion, work that isn't frame-able the way it is. This paper is perfectly good and I keep it because I can't bear to throw away expensive paper, knowing that I can re-purpose it. That's what I often use for my journals and that’s what I used for my Nature Journal. Sometimes I do nothing further to the paper before tearing it down and other times I paint the other side in similar colors so there'll be continuity of color throughout the book.

For the Nature Journal I wanted to push back the color that was already on both sides of the paper so I tore it down to page-spread size and smooshed white gesso over the paint using a broad palette knife and a credit card as a squeegee. Gesso gives strength to the pages, keeps them flexible, and provides a good painting surface for acrylic paint or as a base for collage when using acrylic medium for the adhesive as I most often do.

Tuesday, June 22, 2010

I Stand in Awe


I Stand in Awe
17 x 11
Journal Spread

Sometimes the idea for a piece of work is right there in front of you, waiting to be discovered. Two months ago I made an acrylic decal from a photo in a magazine of a young man looking into the distance...  The decal has been on my work table for ages, just pushed around as I needed to make space. After photographing this spread to show you last week I glanced down and saw the connection between the man and the painting.  Even the splotch of white on the left side page looked like a man's legs... hence the combination of man and nature. This is in my black journal.

Making a Decal:   Paint over an image which was cut from a magazine or a toner-based photocopy with acrylic gel medium. Don't get any acrylic on the back.  I use Golden brand but others work, too.  Let it dry completely and then repeat for 3 to 5 coats.  Turn it over and wet the back and start rubbing. As you rub the wet paper it will start disintegrating and come off the image, leaving the ink/image embedded in the layers of acrylic. Rewet as needed until you've rubbed off all of the paper from the back of the image. Trim around the image and glue it in place on your substrate.

Monday, June 21, 2010

Birds on a Wire

Birds on a Wire
17 x 11"
Journal Pages

I've started to work in my new nature journal beginning with this spread, The 140# watercolor paper had been painted with acrylics, mostly in warm colors. After cutting the paper to size I smeared it with gesso on both sides, allowing some of the color to show through in spots. Then I bound the papers into a book. I chose half a dozen colors to add to the spread but ended up using only burnt sienna and burnt umber.

The idea of the birds came to me as I was working. I practiced painting them on a scrap of paper before adding them to the pages, though it wouldn't have mattered because none of them are perfect anyhow. I used my Pentel Brush Pen for the birds and then switched to a plastic squeeze bulb and Sumi Ink for the drawings. I drew a very sloppy wet line on each page and then tipped the book upright and banged it on the table to get the ink to run. Messy fun, that was!  After the ink had dried I sprayed the whole thing with Krylon clear acrylic coating to seal it because otherwise the ink isn't permanent on the acrylic paint and would simply rub off. The photo was glued on before I sprayed.

Now that the book is bound and I've made a start I can hardly wait to work on the next pages, to see what bubbles to the surface as I think about the beauty of the natural world around me.

Friday, June 18, 2010

Making Journals from Scratch

Black Journal Front
8 x 11

I spent a good part of yesterday binding a couple of new art journals and working in another. Both new journals are made of 140# watercolor paper, torn to size and assembled. For my black journal I first painted the paper on both sides with black gesso, just globbed on, and then tore it down to size. I sewed the 4 signatures, 20 pages, following Martha's directions on How to Rebind a Moleskine   Once I got the signatures stitched I realized that I'd rather have a soft book than one with stiff covers so I found an old acrylic painting on canvas and cut out a 4 x 11" piece to use as a spine and glued it to the front and back. So simple and easy and it looks nice, too.

Black Journal Back

Black Journal Spread
I used part of a watery acrylic painting for a page and sewed it to another piece of paper to make a 2 page spread. This is just the beginning.

For the other book I tore down two sheets of watercolors pours, stablized the folds with strips of fabric and lace, and smeared gesso over everything. The upholstery cloth spine was first sewn to a piece of canvas and  then I sewed each of the 5 signatures to the soft fabric spine with a simple Japanese stab binding.  (There's no decent photo of this one). I finished by gluing the canvas covers to the front and back pages of the signatures using Mod Podge. I know that I'll eventually want to paint the canvas covers but right now I don't know what I want so the painting will just have to wait. I'll show you when it's done.

2 page spread in canvas journal

Some days I much prefer making journals over working in them, but I'm hoping that these books keep me busy for the summer. I'm anxious to get out my acrylic paints and do lots of painting and collage in them.

Thursday, June 17, 2010

Veil

Veil
Daily Collage
5x7"

Another bit of my wedding gown along with some painted papers from my stash.

Wednesday, June 16, 2010

...standing out from the crowd

Standing Out From The Crowd
Daily Collage
5x7"

Quickly making little collages is sometimes a pleasure, sometimes a chore, just like any other sort of creative endeavor. This is a little bit of both. I do love using yellow and my hand grabbed some of these yellow bits almost without my brain being in attendance. The cloth is from a wallpaper book. I added a bit of stenciled paper, a map of Africa, the AX which is part of one of my journal pages, and the picture of my daughter taken in 1995 when she was a young first-time mother. You've seen the faces paper before; it's from a 25 year old Benneton ad... and I'm sure I'll use it again whenever I need a crowd scene.

Tuesday, June 15, 2010

Cancellation Stamps


Cancellation Stamp: Petra, Jordan


… about collecting cancellation stamps in my sketchbook... it IS a good idea! I got one of my first cancellation stamps at a post office in France and another in a tiny closet-sized post office in Jordan… and I have many others, even one from my neighborhood PO branch office. Whether I have to pantomime what I want or simply ask in plain English, invariably the person in charge of cancellation stamps grins and willingly complies by stamping in my book alongside my drawing using their cancellation stamp that shows the date of my visit.


I discovered that the US National Parks sell a “Passport” that’s similar to a real passport with spaces in the little book where you collect rubber stamp cancellations or affix pictorial stamps which you can buy in the park visitors center. You don’t buy the rubber stamp; you use the stamp and ink pad that’s available free of charge. Some state parks and local parks have similar stamps.
Cancellation Stamps on paper
Petrified Forest National Park
The Painted Dessert
Historic Route 66

I don’t have a park passport; I collect my stamp in my sketchbook or on a piece of paper that I’ll glue into my book later.


Monday, June 14, 2010

Draw... even if you think you can't

Montezuma's Castle
Arizona

Here are a few sketches from the small sketchbook that I always carry in my handbag. I seldom have much time to work on these so they aren't particularly good drawings but they are a perfect way to remind me of the day and the place, better by far than a photograph. If possible, I try to get someone to stamp my page. Sometimes I stop in at the local post office or as above I use the official stamp that's often available in the national or state park information center or gift shop.

Pendleton, Oregon

Bookstore
La Connor, WA

Beaverton OR Farmer's Market

Draw. Even if you think you can't draw... DRAW. Soon you'll find that you CAN DRAW. That's how I learned. Put a little sketchbook in your purse or pocket or car along with a mechanical lead pencil or a fine point pen. Draw in it. You never have to show anyone. This is private practice until you decide to show someone what you've learned to do.

Sunday, June 13, 2010

Struggling for Order


Anonymous
Collage
5x7"

One of the quilt patterns that I particularly like is called Log Cabin, so it seems appropriate that I try this design in a collage especially since I'm committed to my Bits Basket this week. Log Cabin starts with a center square or two triangles and is built up by sewing strips of dark and light fabric alternately around the center until the block is the desired size. I started my collage with the museum stamp of a Matisse painting. Then I added the quilt image, then the blue, then the stripes (a bit of photo of one of my paintings)... and then it stopped working.

Log cabin is nearly always a square patch and I'm working in a rectangle. That was one issue to deal with. The other is that I chose too many different patterns and too many pieces of paper for such a small work.  And then I lost my focus on the patterning of light and dark and the concentric addition of strips.

I think the resulting collage is okay; it has some good features, and I kept to my red-blue-tan-black colorway but I much prefer the more simple designs, done with fewer pieces.

Back to the drawing board.

Saturday, June 12, 2010

TriMet Travel

Bits Basket
Layout

Above is a shot of my Bits Basket and a collage as I first laid it out... and below is the finished piece.


TriMet Travel
5x7"

Bits and pieces find purpose in my little daily collages. The subject has to do with the people who are served by TriMet which provides public transportation in Portland on the local bus system, the light rail and the streetcars. The ticket is an old one and the Travel bit served to mark the contents of a drawer in my studio. Other bits include wrapping paper, scrapbook paper, faces from a magazine image, a paint sample, stenciled paper, and a scrap of hand painted fabric.


Friday, June 11, 2010

Once Upon A Time

Once Upon A Time
Daily Collage
5x7"
I used 6 pieces from my Bit Basket today plus some lace from my wedding gown.
Yes, I cut up my beautiful wedding gown and the sky didn't fall nor did our marraige dissolve on the spot. Several years ago we were invited to an anniversary party for those in my church who were married in August. I dug out my wedding gown to see if it still fit. The lace sleeve ripped as I pushed my arm into it.. so I didn't wear the dress to the party but have now cut into it to salvage some of the lace to use in my artwork and I'll save some for my grandchildren in case they get nostalgic.
I used YES glue and it's holding the lace to the paper but I think the best way to add glue may be to iron the lace onto some fusible interfacing. Then I can cut the lace at will and iron it onto collages or journal pages.

Thursday, June 10, 2010

Right

Right
Daily Collage
5x7"

I've decided to work out of my "bits basket" this week, a flat straw basket that's big enough so I can stir and sort all the bits of paper, each one under 4" in the longest measurement. I set myself a challenge to use what's in that one basket; no cheating allowed.

This piece happened very quickly in perhaps 3 minutes plus time to appy the glue.
I used YES glue applied with a big plastic palette knife. I work on top of an old phone book and tear off the page and toss it when it gets slightly messy so I won't get glue on the front of my work.

Wednesday, June 09, 2010

Walking in the Rain

At the end of Northwest South Street, just up the road apiece, there's a new path through some old woods. A quiet place where only the birds accompany my footsteps. I love walking the few short yards from the end of the street, through the woods, and out at the top into the back of the local elementary school. I've forgotten the name of this little plant but it looks like God spread a bunch of green hearts at my feet, just to say "I love you", at least I think that's what he said. Aren't they pretty?


When I come to the top of the hill there's this whole hillside of lupine, beautiful any time of day, though better in the sun than Friday in the rain.

Small ginko trees line the edge of the sidewalk.

Monday, June 07, 2010

Garden Tour

Friends and I went to an open garden Saturday afternoon, to a home perched on top of a hill west of town. The house appeared to be a beautifully remodeled ranch style home with an incredible view of the valley. At the end of the pool is a yoga studio whose walls open to the landscape, a lovely place where these two musicians played. 
There were waterfalls, a greenhouse, a music studio and expansive gardens all around with fruit trees along the road. Heavenly.

Phlomis russeliana
Jerusalem Sage

Allium "Star of Persia"
Stachys lanata (Lamb's Tongue)

Red metal ball with daisies.
(This sculpture is about 3 feet across.)

Still, there's no place like home. I'm grateful for what I have, a perfect-for-us home (thanks Ted) on a good sized lot filled with beautiful plants that's only slightly more than I can handle myself.
back yard as viewed from my studio balcony.

Sunday, June 06, 2010

Catching up

I ran into friends at the local farmers market yesterday who were a bit worried because I haven't posted since our road trip and they wondered if we made it home okay... maybe you wondered, too.  We're fine and had a very good time but declared at the end that there's truly no place like home. My cat snubbed me for a day; the weeds dared me to pull them by their well-developed roots, and the answering machine was full of messages to return.  I turned right around a took a shorter road trip with friends the next week.

Bridge and pier, LaConnor, WA

Every summer for many years some artistic friends and I have gathered for a 4 day "camp". Only once time was it even close to being camping; mostly we borrow a house or rent rooms in an inn. The last few times we've rented space at the LaConnor Inn in Washington state, a beautiful little town on the banks of a canal in Puget Sound, way north of Seattle. We used to take turns teaching each other in rather formal workshops about whatever we had going at the time and we still do in a way, though now its mostly show and tell and we work on our individual projects while we sit and talk. We eat lunch and dinner out... one of the joys of being in LaConnor where each restaurant vies for our attention.


Thousands of perennials respond to the humidity and the sun and make a gorgeous display for us every May so I honor them by taking lots of pictures.

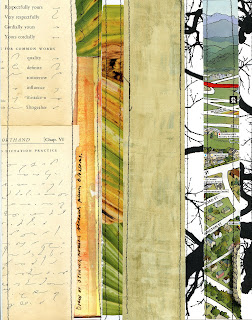
I took my Singer Featherweight with me and sewed lots of paper that I'll use in many ways later. It was fun to sit and sew straight lines. The way I make my papers is to cut lots and lots of strips of interesting paper (wallpaper, scrapbook paper, maps, ledger and music sheets, and my own painted papers, as well as scraps leftover from other projects) and then sew them like stripes to junk mail. I've been using strips of these stripes in daily collages and in my journals, 

 and now I'm drawing trees on the plainer papers. I'm seeing lots of potential here. What do you think?