

Jo Reimer, an artist, living and working in Portland Oregon
Monday, June 30, 2025
Featured Artist at Catherine Bede Gallery
Preparations are winding down as I complete the inventory and pack my car. I've been invited to be the featured artist at a local gallery during the Hillsboro First Tuesday Art Walk and I'm excited to present my work to my new community. I'm taking lots of smalls, paintings and collages in an affordable price range, along with a few larger works.
As well as the Art Walk, the weekly Farmers Market will fill part of Main Street, which will be closed to traffic, making it easy for pedestrians to wander among galleries, restaurants, food carts, and farmers produce. Live music in several shops add to the excitement, as does the roar of vintage cars showcased in front of the courthouse.
I can hardle contain myself.
I've been obsessed with painting flowers. I began in the winter, learning to see and paint lovely posies from Trader Joes, and now am painting flowers that grow in my own front yard. Here's an example of a 6 x 6" flower painting on a wood panel.
Save the date, October 18-19 for Washington County Open Studios. I'm participating this year and sharing my space with pastelist Harley Talkington. More about that later.
I'd love to hear from you. Comment below or email me at joreimer-at-comcast.net. (leave out the dashes, of course)


Tuesday, February 22, 2022
Never Give Up. Never. Never.
Have you ever stopped doing a creative practice and then tried to restart after a solid block of time has passed? It's not a pretty picture!
Do as I say, not as I have done. I stopped painting. I stopped making even the smallest collages. I stopped sketching. I stopped practicing my art.
And now I'm struggling to get back to where I left off. Really struggling.
I stopped sewing.
When we downsized five years ago I thought I'd give up sewing... and I did for quite some time, maybe two years. Then one day I had the urge to make a knit top but even with the experience of making clothes since I was 9 I had forgotten some basic skills.
I had forgotten a basic alteration I always make to a pattern so it was cut wrong at the start.
I forgot which way the thread should unroll off the bobbin and did it backward. Had to rip out the very first seam I stitched... after I remembered how to change the stitch length! I had sold my serger so had to figure out how to finish the seams without it.
The top didn't fit. Of course it didn't. I had given up the practice.
I stopped practicing art-making.
I had excuses. There was a letdown after my successful Open Studio and I was tired. Then came the holidays and a wonky schedule. I had some health issues that slowed me down and I drifted away from my normal studio routine. I gave up painting, drawing, collage.
Now I'm struggling to get back and I'm making all sorts of beginners mistakes that are quite frustrating. But I'm trusting that I'll slip back into those neural pathways I laid down in my brain and find my mojo soon.
Then I began again.
HOW? How did I begin again?
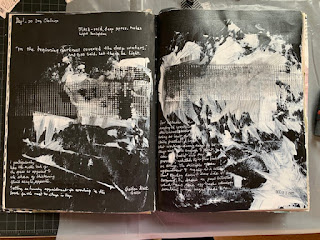
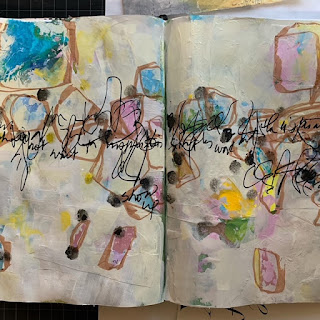
- I joined Cheryl Taves's #insightcreative30daychallenge at the first of the year and while I haven't kept up with doing a journal page every single day according to her prompts, I have resumed my regular practice both in my new studio journal and writing Morning Pages.
Journal spread using black Journal page using white over color
- I spend a few hours each week mixing paint. That's such great fun and results in some awesome collage paper.
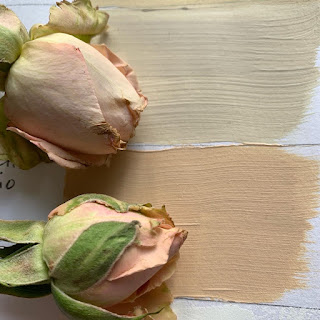 |
| Matching paint to roses |
- I've decided to spend up to $15/week on flowers for the studio... and I'll draw them, use them to inspire paintings and collage papers. The bunch of roses I bought yesterday are gorgeous, sort of a buff titanium/dusty pink color and so lovely. I've matched the colors and painted the roses... not worth showing, either but I won't let that throw me
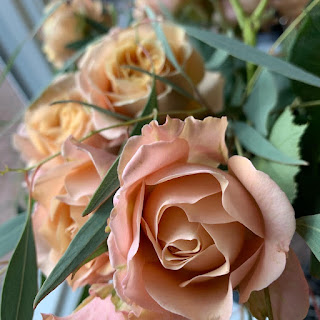 |
| This week's flower selection |
- I began a series of works on paper using paint and glue. The results are rubbish so far but I'll continue adding layers, knowing that as I work the ideas will come.
- I began drawing... blind contour drawing.
 |
| Blind contour drawing of the roses. |
- And I signed up for CVP 2022.
Blind Contour Drawing
For those of you who aren't familiar with this method, it's a simple and deeply satisfying way to look and draw. While looking at your subject, and without looking down at the paper, draw the object, following the contours/edges as though you are an ant crawling across the edges, letting your hand move along with your eyes, slowly, steadily, without peeking. The results will surprise you. Make it a game. Do it over and over. One drawing after another until you run out of time or your hand cramps. Yes, you can look between drawings. Click here for a video about Blind Contour Drawing.
Draw with ink. Use a cheapo ballpoint or whatever you have. Maybe you prefer a pencil.
You could use an old textbook or book of poetry as use as your Blind Contour Drawing journal and draw right on top of the pages. Or lightly coat each page with gesso first. (Let it dry before drawing or try drawing into the wet gesso.)
NEVER, NEVER, NEVER GIVE UP.
Even if it's only a simple drawing or collage or watercolor painting, keep up the practice of showing up and doing a bit of creative work.
Are you considering Nick Wilton's Creative Visionary Program? I've signed up for the third year. It's the most helpful course I've ever taken and while it's pricey it's a huge bargain compared to what you get in art school or from taking a few of the usual weeklong workshops, either local or distant. With CVP you'll have three months of intensive direct online involvement and then 9 more months of interaction with the teachers and other students and alumni, plus you get a deep discount when you enroll again in future programs. Call or email me if you want more information.
(Using this affiliate link gives me credit and costs you nothing.)
Sunday, February 13, 2022
A VALENTINE GIFT FOR YOU!The free Art2Life workshops start tomorrow, February 14. Don’t miss out. A week of intensive and fun experiences, delivered online, will help improve your art quickly and easily no matter what medium you prefer. Workshops and daily Facebook Live events will be delivered throughout the week to those who register. I’ve done the free workshop for three years running and my art started to get way better right away. I work with acrylic paint and paper collage as well as using watercolor for urban sketching. The training helped me with all these media and you can expect the same for yourself if you do the work. Click here or on the image to register: |
 |
The workshop week is really free… with no hidden costs, no annoying catches…. just 5 days of short classes and events delivered by my fantastic teacher Nicholas Wilton and his Art2Life team. Their unusual take on using Design, Value, and Color to make better art will be a game-changer for your art. The week of events begins tomorrow, February 14. The workshops are recorded and delivered online at your convenience so that you can view them at any time until February 23. Grab your sketchbook and a pen and join me for the Art2Life free workshop. |
Thursday, January 27, 2022
For any struggling beginner or experienced artist....
Do you need a transformation…maybe a new way to look at your work? Do you find yourself getting stuck in old habits? Are you a beginning painter who wants to know more about how to master composition?

The workshop includes 3 video lessons that cover the principles
of Value, Design and Color, and are released over the course of 5 days. Each
lesson is about 20 to 30 minutes long. You can watch the lessons any time after
they’re released through February 23rd. In addition to the video lessons
you receive via email, there are also Live, in-Studio Trainings all week. These
Live, in-Studio Trainings will give you the opportunity to ask questions and
see the A2L Principles applied to artwork in real-time. You’re going to LOVE
this! I’ve seen first-hand the changes this makes for artists, so I know how
helpful it can be.
Click here to
save your place in the free Art2Life Workshop!
At the end of the Free Workshop, there is an opportunity to
enroll in the 3-month Creative Visionary Program. This program is suitable only
for those wishing to go much deeper with the content of the Free Workshop. It
may or may not be right for you but regardless, the Free Workshop is super
helpful…and FREE!
Monday, October 25, 2021
October Wrap-up to Open Studios
|
Thanks
for visiting my studio! |
||||
|
I’m so grateful for the good
turnout last weekend as I opened my home to art lovers who were touring
Washington County studios. The weather was great and interest was high. Thank
you for coming out and supporting me. Most of you know that I have
two spaces in my home set up as art studios: the original one at the back in
what might otherwise be a master bedroom, and the messier area in half of the
garage. People had a look at much of the art I’ve created in the past 5-6 years and I’m happy that many pieces went to their forever home. Visitors expressed many times how they were inspired and motivated to be creative after seeing how I fit art into my everyday life. Great! That’s exactly my intention… to inspire others to be creative. Collaborative Painting Ahead of time, I set out six 12-inch quarter-inch thick birch
panels on the painting table. Every guest was invited to take a non-brush
tool and leave their acrylic mark on the boards.... creating the foundation
for a collaborative work of art.  Early
Monday I restored the garage to its normal function and reclaimed the parking
spot, itching to tackle the 6 panels. I pulled out an old book and glued the
pages to the panels using acrylic gloss medium as glue and on top to seal and
let the whole shebang dry overnight.  The next day I pulled out my palm sander and went to work.. sanding down the panels, removing much of the paper while leaving the transfered text and some of the paper, and this was the result. It’s hard to see detail, especially if you’re reading on your phone, but believe me that some of the details on each of these boards are achingly beautiful, especially with a coat of gloss medium to pull out the colors. And then….
|


Tuesday, October 12, 2021
OPEN STUDIO OCTOBER 16-17
You're invited!

Washington County Open Studio Tour - October 16 and 17, 2021.
Hours are 10am-5pm.
Link to the map.
If you can't visit in person, most of the work is on my website.
Link to Jo's website
The tour is free. Pick up a physical map at the studio or any participating artist as well as The Village Gallery.
Both areas of my studio will be open, following current Oregon masking and distancing protocols. Please wear a mask. And no, I don’t like them either.
I have some fun things to share with you including a collaborative painting project whereby you get to add your own marks to a group painting.
Take your time; look around; get ideas for your own studio setup. Mine's in the garage and in a reclaimed bedroom. Lots of paintings are on display, most for sale, some at discounted prices. Greeting cards are available, too.
Here are a few works on display and for sale.


Wednesday, September 22, 2021
SHOT FROM A TALL LADDER - THE GARAGE ART STUDIO
Welcome to another online studio tour. I hope to inspire you to make-do with what you already have.
This is my garage studio
One of the bays in our garage has been repurposed; it’s now my painting studio in all but the most inclement weather. A workbench and some shelving were already in place, and I added a couple of tables, two trolleys, my easel, a tool chest for paint storage, and a child’s toy cabinet. A friend built a freestanding painting wall from three hollow core doors so I can use one side for paintings in process and the other for display. Since I took these photos I claimed the opposite wall for large canvases, and during Washington County Open Studios I’ll spread out across the entire garage in order to display more artwork.
 |
| BEFORE |
It was pretty but dark, so I increased the lighting and covered everything with white paint.
 |
| AFTER |
 |
| THE PAINTING WALL AND 4FT. TABLE |

6FT PAINTING TABLE
 |
| TOOLS OF THE TRADE |
The drawers of the workbench hold miscellaneous items such as sponges, paint rollers, assorted paint sticks, inks, paper, and even a few woodworking tools.
I use tools and supplies intended for other uses. The yellow tray is a styrofoam meat tray. The red plastic box came from a paint store, intended for paint and roller. The black covered take-out container has been repurposed into a small stay-wet palette. I used the big lazy-susan container at the rear on my desk for years... bought for office supplies and now for brushes. And of course, there are the yogurt cups and brushes for water... must have lots of water handy.
 |
| PAINT TROLLEY |
 |
| TOOLS OF THE TRADE |

I'm forever grateful to the former owners of this house for building out this corner of the garage so I didn't need to do so. Plastic on the workbench, paintings, foam-core, old magazines, canvases, and my heater, all up and out of the way on those shelves.
I hope this peek at my garage studio inspires you to make do with what you have, and that those who live close enough will come to see the studio in person on the weekend of October 16-17 during Washington County Open Studios.
I'll have free maps available to direct you to the many other artist's open studios within the county.
I'm asking all visitors to wear masks. This is my home and I must protect my family.
There are two studios.
Yes, you read that right. You'll enter the garage studio, and after looking around there, you can go down the path to a back door into the collage studio where I'll limit visitors to 4 at a time. Read about this studio in my last post.
If you find a work of art that is just right for your home you can pay with a card, cash, or through an app. We make it easy to claim your treasure.
I'll have all sizes and price points available, from $4 cards to larger paintings... there's something for everyone.
Come any time between 11 and 5 on October 15 or 16. I'll be waiting.
Jo
Tuesday, September 07, 2021
Don't put it down; put it away
Don’t put it down; put it away
… that’s Mom-speak which still rings in my ears.
My goal is to have this place show-worthy when you walk in
the door, but when I go to put an item away, I find myself wanting to play with
it instead… to paint, or draw, or glue, or sit down to write a newsletter. The
writing comes lots easier than using the Mailchimp software. And now I’m paying the
price: two untidy studio spaces.
Two studios in one small house!
Yep, I’m gradually taking over the house. And how grateful I am to have room to play right here at home. I began the takeover when we moved in 5 years ago, downsizing everything. I disposed for two-thirds of my art supplies, but that still left lots, and I can’t resist buying more and scattering it all about, too.
We decided to sleep in the smaller of the bedrooms and let me remodel the master for art-making. That worked for about a year, and when we gave up the extra car my greedy eyes fell on the empty bay of our two-car garage… the wider side and the workbench. So, I went to work converting it into a painting studio while preserving the original studio for collage, office, reading, and sewing.

Visualize me on a tall ladder with my handy smartphone
camera, taking overhead shots so you can see the mess! That was such fun that I made
detail shots about what’s used where and why, hoping that my
setup strikes a chord with you. Watch for future newsletters and come see it
all in person.

The middle of the room is taken up by two tall 2 x 4 ft. tables that give me standing room to work with paint and paper. It stays messy but that's a sign of the artist working daily at her job.


Painted plywood is used for the top of the flat files and I placed a tall Ikea table over that, leaving a
5" high space between for unresolved paintings.

Save the date! Mark your calendar now!
October 16-17 from 11:00 until 5:00.
14150 NW Bordeaux Lane, Portland, OR 97229
Masks required.
Email me your address if you want a postcard reminder:
joreimer255 @ gmail.com (no spaces)
Saturday, February 20, 2021
WETLANDS sketches
Last week I showed you how I taped off a large sheet of paper, preparing to paint some sketches of the nearby wetlands. I made the six sketches using acrylic paint, collage papers (paper bag, washi paper with embossed leafy vines, heavily textured washi, and drawn lines.
Like sometimes happens, some of the results were very helpful in moving forward and some told me what not to do.
I scratched back into wet paint to make grass-like marks and used parallel lines to indicate the boardwalk. That led me to thinking about symbolism and how to use symbolism within abstract paintings to reference my thoughts and emotions and observations.

Scratchy lines in wet paint indicate the tangle and chaos of the vegetation.
Tall curvy and dark lines refer to the trees along the edges of the wet.
This week I'll work with those ideas to paint on 4 12" panels, a 16x20" canvas, and a half-sheet of mixed media paper. It's simply experimentation and having fun with no preconceived outcome.
I have no idea what the results of all this might be. and that's okay.


Friday, February 05, 2021
Still Scattered
I goofed on the links on the last post. Click the image to sign up for the free workshop.

Making Something of my Scatterbrain
The family knows this about me. Friends... not so much.
I'm not naturally organized.
... though I appear organized and efficient it's only the result of hard work. It probably comes from being creative, a maker, one seeks and solves problems. But the result is a frequently messy workspace, whether it's my kitchen counter, my desk, or any flat studio space. It feels like I'm constantly picking up after myself. Years ago my mother's constant refrain was "don't put it down, put it away".
I work at being organized.
My own answer to being naturally disordered is to have systems and stations within the spaces of my home and studio and remember to put each thing away in its designated place when I'm finished using it. Somedays I'm more successful than others.
In the kitchen, there's a cabinet for ingredients above the counter where I bake, and within that cabinet is a carousel for baking spices and flavorings, another for cooking spices, and so on. There's a cupboard for glasses next to the sink, a drawer of spatulas and big spoons next to the stove.... you get it.
And in the studio, I have stations for sewing, desk/computer work, painting on the wall easel, painting, and journaling at a table, with rolling drawer units underneath for the small tool storage.
I got tired of cleaning off the white desktop where I paint and draw so I decided to kill two birds with one stone and taped off an 18" x 24" sheet of mixed media paper and taped it to the desk. It will catch all the runoff from painting and testing and in the process, a surface of marks and colors will accumulate on the paper which I can use in a future set of small works.

It's time once again for the Art2Life Free Workshops. Yes, It's FREE! You can sign up by clicking HERE. The free workshops are only accessible through the link. Go ahead and sign up and you'll start getting really fun text messages from Nick Wilton with creative challenges and tips for painting. Of course, you'll need to leave your contact info. but I guarantee you that it's safe and you won't be bombarded with unwanted emails afterward. BTW, if you've already signed up through another link, I'd appreciate it if you do it again through my affiliate link.
I'm a huge fan of the Art2Life courses, having taken the Creative Visionary Program (CVP) two years running. It's changed my art and added joy to my studio practice. I can't sing enough praises! Just do the free workshops which start February 15 and see if it's a fit for you, too. You'll get an emailed lesson three mornings and can do the exercises whenever it's convenient.
Tuesday, December 29, 2020
50 in 50 CHALLENGE
What do I mean by 50 in 50?
I've been making notes about ideas that I might chase after in 2021. Not resolutions. I don't do guilt anymore and resolutions do nothing for me but bring on the guilt because I rarely carry through.
No, I'm still working on FOCUS. Staying off the rabbit trails that lead me away from my PATH. Unlike the magpie who chases after all the bright shiny things, I would like to use what I own, what I know, ideas I have, and build on that. I intend to continue learning and experimenting.
So, 50 in 50 comes out of the idea of reining myself in and using my stuff. I'm challenging myself this way:
During 50 weeks in 2021 I'll work with 50 art tools.
one each week
Every week in 2021 I will choose one art supply, tool, process, technique and see what I can make of it during the week.
I've left 2 weeks for holidays but I'll take more time off whenever I need or want it.
I'll be flexible. This is meant to be a fun way of teaching myself ways to use these things in my current ... in my paintings, in collages, in my journals. Only rarely will I use these things as a stand-alone exercise. The question will be "how can I use this____ on the painting on my easel, or on a journal page).
I've made my list by typing each item into an Avery return address label template (I used Avery 18167 from their website). I then attached each label to an index card. The cards will live on my desk, banded in blue, and I'll choose one when I have my weekly planning hour on Sunday afternoon.

If you'd like a copy of my list for ideas for making up your own list just ask (in the comment section or by email to joreimer (at) comcast.net) and I'll email it to you. Remember, this is a list of supplies I own; your list will be different.
Since I post most of the art I make on Instagram or Facebook you'll likely see what I make of 50 in 50 there.
Wishing you a bright, healthy, happy 2021. (that's a lot harder to type than 2020)
Thursday, November 19, 2020
HOW TO PRINT PHOTOS ON TISSUE PAPER
SUPPLIES:
- 1 sheet of cartridge (copy) paper
- Tissue paper. Any will do but the best is the kind you buy at an art supply store.
- Photos on your computer
- Laser printer
PROCESS:
- Make a Carrier Sheet by folding down ½” of the top edge of the copy paper. (this can be used multiple times.)
- Cut tissue paper to the same size as copy paper: 8.5 x 11”
- Slip the leading edge of a sheet of tissue under the fold of the copy paper.
- Put it into your computer so the tissue I on the same side as the print heads of your printer.
- Pull up a photo on your computer, either from your own photos or a copyright-free image and print it with black ink. (I suppose this works with colored laser inks but I haven’t tried it.) Instead of using the folded edge of the carrier sheet you can tape or glue the tissue paper to a sheet of copy paper, using low-tack double-stick tape or a glue stick.
TROUBLESHOOTING:
- If the tissue wrinkles or jams as it goes through the printer, work it out and try again, perhaps using a glue stick to glue the edges of the tissue in place.
- The resulting printed tissue can be used in many ways in your painting. Make lots of copies of printed tissue and experiment.
- Always apply glue to the receiving surface, not to the tissue. I use acrylic medium of some sort, brushed or scraped onto the substrate. I avoid wrinkles by lightly misting the tissue paper before laying it in place. This relaxes the fibers in the tissue before it hits the glue. Use a rubber scraper to gently work out any air bubbles. Brush more medium onto the surface to seal it down. The tissue will mostly disappear into the paint leaving a sharp image.
Saturday, October 17, 2020
Every House has a Story, a Collage Tutorial
 |
| House on a Hill 16" x 12" collage on panel available EVERY HOUSE HAS A STORY On visits to my hometown in Arkansas I'd often drive east on Highway 10 passed a lovely old unpainted house on the rise just back from the road near Blue Mountain, and I'd wonder about the people who lived there. I made up stories about it, though they were just flights of fantasy. There was something about that house that really appealed to me. Sometimes there were flowers in the front yard but I never saw a person, no signs that a child lived there. One day I slowed the car, rolled down the window, and shot a photo.  Who lives there? How do they make a living? They must be old because there's no trike, no red wagon in sight, just the lonely house beside the busy highway. Year after year the same. Then one day I drove there to take some good photos and maybe knock on their front door... THE HOUSE WAS GONE!  |
The farmer is heading to the house where his supper waits on a red checked tablecloth... leftover fried chicken and mashed potato cakes, with some juicy ripe tomatoes out of Mama's garden and chunks of sweet onions. Maybe pecan pie and ice cream and a night of untroubled sleep.
HOW I MADE THE COLLAGE
Smooth a thin layer of gesso over the panel. While the gesso dried I printed some photos onto tissue paper and began selecting sections to build the farmyard idea. I augmented the house photo with a photo of a barn of the same vintage, and a photo of my father, also the same vintage. I printed several copies of the photos so I'd have extra bits of tree foliage to piece together.
HOW TO PRINT PHOTOS ONTO TISSUE
Make a carrier sheet by folding down the top 1/2" of a sheet of computer paper. Slip a piece of tissue, cut to size (8.5 x 11"), under the folded edge. Place in your printer, fold first. The fold protects the leading edge of the tissue from bunching up in the printer rollers. There are other methods; look on YouTube. Warning: expect a few printer jams before you master the process. Your printer manual will tell you how to retrieve the jammed paper.
I used Liquitex Gloss Medium and Varnish to adhere vintage book pages to the support and then glazed over the papers with gesso juice (1 part gesso to 1 part water) to soften the text and add a bit of mystery, and let that dry thoroughly. Then I added more tea-dyed papers on top.
I'm sorry... I got so excited about the work that I forgot to take more process photos!
And finally, I got to THE IMAGES
I decided on a landscape format because of the general look of the background and the stormy sky at the top. I played around with the placement of the images before settling on the final composition.
GLUING TISSUE PAPER IS TRICKY.
You need to put the glue on the substrate, not on the tissue, but in order to prevent the tissue from wrinkling it needs to be moist. I have a spray bottle that sends out a fine mist that works well with fragile tissue.
Put the glue on the substrate, lightly spray the tissue, count to 10, and lay the tissue in place, putting one edge down and carefully rolling the rest in place. I keep a rubber bowl scraper at hand and use it to flatten out the tissue.
I know I typed that fast and made it sound easier than it is. Working with tissue in this way takes lots of practice and patience... and a willingness to scrape it all off and start over if need be.
So there you have it, a House on a Hill, with a story to go along with it.

Please leave any questions about my process in the comment section below. If you have a question I'm sure others will want the answer, too.
Best regards,
Jo
Thursday, October 01, 2020
Woo Hoo! I'm showing in the Beaverton Art Mix
Beaverton Art Mix VIRTUAL show begins today and I'm beyond pleased that four of my paintings are in the show and that I can offer you an opportunity to visit my studio to see more of my work.
Beaverton Art Mix virtual show:
Here's the link to the BAM show. Search by artists' first name or click on Random Artist.

Vera. 24" x 36". acrylic on canvas.
Make an appointment.
Open Studios for both Portland and Washington County have been postponed until next year. Knowing that many of you enjoy visiting artists' studios every October I have decided to host my own informal open studio, with social distancing protocols and no more than 6 visitors at a time, throughout the month. I live in a gated 55+ community so appointments are absolutely necessary.
You are welcome to visit my studio.
Contact options are noted on the BAM website. Simply search for Jo Reimer and you'll find my phone number, email, and website information so you can make an appointment to visit. My acrylic painting studio is inside my garage and my collage studio is accessible via a door from the courtyard. I hope you can come sometime in October. The garage is wheelchair accessible but the collage studio requires two steps up.
Fair warning! I've decided to leave my studio in working condition rather than to perk it up with special displays, so if you visit you'll see how I really work day by day.
Thursday, September 17, 2020
Goodbye Summer 2020
Goodbye Summer. I missed you... I think.

Friday in the Garden
12 x 12 Mixed Media
I was determined not to waste a single summer day, but it happened. Maybe it was the weather that caused me to waste time. Certainly it was current events, what with a worldwide pandemic and my husband and me right smack in the middle of the range of senior citizens who needed to be extra cautious in public. So we were. We stayed home, and while I intended to spend the summer painting in my lovely studio I didn't get around to doing much painting. I gardened. I puttered around the house. I fiddled with my collage papers. I wrote copious plans in my journals, plans for someday, just not right now, thank you very much. I'm hibernating.
Bless her heart, Crystal Neubauer recorded some encouraging collage related demonstrations on Facebook and directed viewers to join her in making 5-minute collages as a way to begin the day. If you've been around this blog from its beginning 10 years ago you'll remember that daily collages prompted this blog, One-A-Day, in the first place. I was making 5x7" collages, one every day and writing about what I learned in the doing... and here I am, doing it again.
Upon being prompted by Crystal I gathered scraps of watercolor paper and cut dozens of 4" squares, gathered a box of collage compost, and my YES! Paste mixture and began. I'm just 4 short of 100. One Hundred small collages finished. I call them Lagniappe. That's pronounced LAN-yap, and it means a little something extra, a gift, like a baker's dozen or 13 donuts. I heard it in New Orleans years ago and always liked the idea.
I'm back to sewing, making masks again. In the spring I used my very last tiny bits and pieces to make masks for a local medical clinic but had to quit when I ran out of fabric. Recently a couple of friends gave me their scraps so I'm at it again. I set up my sewing machine on the dining room table and am doing an assembly line routine of cutting, pinning, and sewing, an hour one morning, 15 minutes while the kettle boils. It all adds up and no matter how long it takes I'm sure I'll have dozens of masks ready long before we can safely bare our faces.
I live in the Portland OR suburbs and if you've been following the news you know that our normally clean pure air is the worst in the world this week due to all the wildfires devouring our forests and farms. I'm thankful for tightly fitting windows and doors and a good air filter on the furnace as I join thousands of others praying for rain.
That's all. I'm just checking in with all ya'll. (giggle if you must; I'm Arkansas born and that's how I learned to talk way back when). I hope you're well, exercising your creative muscles, reading some good books, and have found better movies than we have on Netflix.
Yes, okay. I'll take some pictures of my little collages to show you, maybe next week if you ask nicely.
Anything else you want to know about?
Jo
Friday, May 29, 2020
How to Begin a Painting
HOW TO BEGIN A PAINTING
My friend asked me how I begin a painting and what are the layering steps. That's a question that frequently comes up, one I also like to inquire of other artists. I'll answer by showing you some of the beginning layers... they're Are Not Pretty.
 |
| Tangles 10x10 acrylic on paper |
This first image is of a finished painting which I began as described below:
BEGINNING A SERIES
Layers 2-6: I chose a limited number of colors for my palette: yellow ochre, ultramarine blue, black and white, and began making marks using a variety of tools: brushes, squeegee, old credit card, painting knife, trowels, a dental pick for scratching lines, a silicone scraper, grease pencil, and probably some other things that I've forgotten. I worked for one hour and turned these 6 boards....


Yes, I know they are still ugly, but they are related and the layers of paint on paint on paint give me something to respond to. If you click on the pictures you can get a more detailed look at sections of each piece. At this point there was so much wet paint on each piece that I had to give it a rest and let them dry.
My next step will be to go over all six pieces with my electric sander in order to reveal bits of the color that's underneath. I'll take pictures and show you my progress in my next post.
NEW WEBSITE!
If you aren't familiar with DPW treat yourself to a subscription that features the work of hundreds of painters delivered as a once-daily email to your inbox.
Monday, March 16, 2020
DIY for Artists, an Inexpensive Painting Surface
Whiteboards as an Inexpensive Painting Surface
 |
Inspiration Board for CVP2020
|
This great idea comes from Eugene OR artist, Patti McNutt who often uses
ordinary whiteboard panels for a
painting surface. It’s available at lumberyards in 1/4" thick, 4 x 8-foot sheets and sometimes as small as 2x4ft.
Ask for MDF White Vinyl panels.
To save time and effort apply a couple of coats of gesso or
interior house paint to the raw side of the full sheet of whiteboard. Cut the
large panel to the size you require for your work. The whiteboard side becomes
the back of the panel and you paint on the side to which you apply gesso.
If you buy a 4 x 8 ft panel you can cut it down to 32 twelve-inch
square panels. Each panel will be slightly less than 12” due to the slight loss
from the blade cut. These are great for practice panels but I’ve been able to
insert my 11 7/8” panels into both float frames and into regular 12” frames.
Look for MDF White Vinyl (1-side) panel which is currently
$23.81 at Home Depot. For $24, each 12” panel would cost you a mere 75 cents.
If you choose to use ¼” birch plywood, at $28/4x8 sheet,
your 12” panels would be only 88 cents each.
Of course, some of you want panels that are exactly 12”
square, just like the art supply store sells. You can still cut 20 twelve-inch
panels for $1.40, as well as twelve more 10” panels from the scrap.
Unless you’re handy with a table saw don’t cut the panels
yourself. Find a handyman or friend who will do the cutting for free or in exchange for one of your paintings. Don’t
expect Home Depot to cut the wood accurately. They don’t have time to be careful, nor are
their blades sharp enough. (Experience speaks here.)
I have lots of my own original work for sale on my DailyPaintworks gallery. Have a look here:
Friday, February 14, 2020
It's not too late to sign up for Art2Life free workshops.
 |
| Nick Wilton |
Nick offers these workshops each year as a lead-in to signing up for his Creative Visionary Program, a 3-month online art course that I took last year. Watching the freebie convinced me that this program was for me... and I sure chose a winner.
My work and my approach and my process of creating good art have all improved leaps and bounds.
I didn't go to art school but I have attended dozens and dozens of classes and workshops over the last 50+ years and I can say honestly that CVP is the best of the best.
I learned SO much and gained confidence in my process so that my work never fails to give me pleasure.
If you haven't already signed up to take the free workshops, please do so. Click here. You'll learn something valuable to your own practice.
Subscribe to:
Posts (Atom)
