Thursday, September 17, 2015

VISITING ARTIST'S STUDIOS IN PORTLAND OREGON 2015


I'm a bit of a voyeur... in a good way. I love seeing people in their own element, especially artists in their studios. So when Portland artists banded together 17 years ago I jumped at the chance to visit other artists' studios to see where they work and learn how they do what they do.  Portland Open Studios is an annual event that takes place the second and third weekend every fall. This year there are 105 studios open to the public and you can visit every one of them if you have the stamina. 

I usually tour with two or three other women. We buy a guidebook or a phone app which describes each artist's work, complete with pictures, and has maps to get us there.  We choose 12-20 studios we want to see and often see them all in a single, very full day.  We find it's easiest to tour by area to avoid backtracking. Printed guide books are available at New Seasons, Muse Art & Design, or from individual artists. Both the free phone app and the $4.99 app have GPS coordinates to help you plan your route. (The apps haven't been released yet. Don't make a mistake and buy last years app.) 

We usually start at a studio in our neighborhood, often that of a friend, and branch out from there. Bright yellow signs with arrows are placed at intersections pointing you to the closest studio. Park, leave your shoes at the front door if that's requested, and walk right in. It will be clear where to go. Poke around, ask questions, watch the artist at work, leave your contact information if you want notification of his/her future events, and move on the the next studio. Many of the studios are in the artist's home but some are in commercial spaces, all interesting, all worth seeing.

Each tour artist sells their work so if you see something that fits in your home or place of work buy it directly from the source. I've purchased some of my favorite pieces this way, complete with the story about how and why it was created. Some artists have greeting cards, calendars, or books for sale. Art makes a grand gift for a loved one.

Don't count on finding work that's ready to hang, not when you're buying directly from the maker. You can take the work to a professional framer and have it framed the way you want it done, saving money and ensuring that you get frames that go well in your home. This year I'm making an effort to have most of my work ready to hang, but don't count on it. I'd rather make art than prepare it to hang.
I'm also participating in the Washington County Open Studios Tour which coincides with the Portland Tour, the third weekend of October. These are artists who live farther away from Portland and include artists in Cedar Mill, Beaverton, Hillsboro, Banks, Sherwood, Tigard, North Plains. Guidebooks are available at Art on Broadway, Village Gallery, and from individual artists. There is no cost for this tour guide. Start touring at my house and get a guidebook from me. There are two other artists in Cedar Mill who are participating in both tours, Annie Salness and Gretha Lindwood. Click on their names to see their amazing artwork.

Which Way Up  was chosen as cover art for the Washington County Studio Tour Guidebook.


So, how and why am I a participant in the tours this year?  It's all because friends egged me on with assurances that people would be delighted to see my studio and learn something useful from me. So I decided that there's no better time than now.  Participating isn't automatic; these are juried for admission so I feel especially honored to be part of both tours. So last spring I filled out a form, send images of recent work, crossed my fingers and said a prayer and waited to find out if I made the cut... and I did.. and the work began. 

Putting on the tour is a cooperative event with each artist paying a fee to cover publicity, printing the guides and designing the apps and signage, as well as putting in volunteer hours to see that the behind the scenes work is done.  All this on top of continuing making art. This year my extra hours were spent working in the Portland Open Studios booth at Art in the Pearl and helping with the beta testing of the iPhone app.

Click these links to learn more:
Portland Open Studios October 10-11, 17-18.        10am-5pm.
Washington County Open Studios October 17-18.   11am-5pm


Tuesday, September 08, 2015

Collage Without Wrinkles


Collage without wrinkles

Jo Reimer, collage

One of my main problems is wrinkles. Wrinkles in the papers I use in collage, that is.

Moisture in the glue soaks into wet paper as I work causing the paper fibers to relax and form permanent wrinkles in the direction of the grain. I prefer a smooth surface. The solution isn’t necessarily to change the adhesive. I needed to learn to work with the natural characteristics of the paper and my preferred adhesive. Here’s what I’ve discovered about avoiding wrinkles.

Wrinkles happen when I use a wet adhesive to apply paper to a dry surface. There are several solutions but mainly the aim is to equalize the two surfaces in some way before sticking them together with just the right amount of adhesive. These are some clues to best practices. I don’t use them all at the same time.


  •  Mist the paper with water. Give it time to curl up and then relax. When it relaxes apply the glue.  For thin paper, apply the glue to the substrate, not the paper.
  • Wait a couple of minutes after applying glue to allow the paper to relax and absorb moisture before placing it on the substrate.
  • Use only as much glue as necessary. Too much glue will dry unevenly under the paper and create bumps and ridges.
  • Spray collage papers with an acrylic sealer on both sides and let it dry. Proceed to apply adhesive and build your collage.
  • Apply a thin coat of polymer medium to both sides of the paper. Dry thoroughly. Store between sheets of wax paper or plastic. Use a tacking iron to fuse the papers to the substrate. (Jonathan Talbot method)
  • There’s less wrinkling when the grain of the paper and the grain of the receiving surface line up.
  • When using acrylic medium glue the paper to the substrate and let it dry before coating the top with more acrylic. This allows the paper to relax and pull back into shape.
  • 3M Spray Mount won’t cause paper to curl and wrinkle but you have only one shot at getting the paper in the right place on your collage, plus there’s the whole fume and over-spray issue. I use a big plastic bin in which I place the paper face down on an opened magazine. Spray and quickly close the lid. Wait a minute and lift out the paper and apply to your substrate.

 Technique:

·         Work on top of kitchen parchment paper. Glue won’t stick to it. Or use old magazines as your working surface, discarding wet pages as you work.

·         Apply the glue with a palette knife or medium-soft paintbrush working from the center out to the edges. Place the element where you want it. Gently squeegee from the center to the outer edges using an old credit card or something similar and wipe off any adhesive that is squeezed out from under the paper. Let it dry thoroughly before adding a coat of matte medium on top of the composition. Dry again. Seal with a spray sealer. (I’ve ruined work by using a brush-on sealer without first applying a top coat of acrylic medium.)

·         Don’t hurry the process.


Tools and Adhesives:
  • My favorite spreader is the large plastic “Scotty” painting knife by Richeson.  Buy at least six. 
  • 1 1/2” Purdy nylon paint brush for spreading glue.
  • Matte Medium from Golden or Liquitex  
    Polymer medium from Golden
  • YES! Paste, mixed 1:5 with acrylic glazing medium (thanks Crystal Neubauer)
  • Matte Medium mixed 1:1 with Elmer’s white glue plus a few drops of Dawn detergent. This detergent breaks down the clay coating of magazine papers, reducing wrinkling.
  • Krylon Crystal Clear Acrylic Coating


Resources:

Johnathan Talbot: Collage, A New Approach


Crystal Neubauer: The Art of Expressive Collage


Monday, August 10, 2015

Art in Interiors

I love seeing my work hanging in a patron's home. 

Prairie Grass Oklahoma found a home... in Stillwater, Oklahoma, in the home of my sorority sister, Deborah Strickland. Doesn't it look great here in her sunroom?


If you own one of my paintings please send me an image file showing where it hangs in your home, with permission to post the photo here on One A Day.


Wednesday, August 05, 2015

Somewhere Over Colorado


Somewhere Over Colorado. 16 x 16".  Mixed Media.
by Jo Reimer


Here's an addition to my MAPS series. Watercolor over a  map of  Colorado.  

I love sitting at the window whenever I fly home to Arkansas via Dallas because the land below is so interesting. As one crosses the eastern edge of the Rocky Mountains  farmlands appear, dotted with thousands of irrigation crop circles. Some farms have many of these circle irrigation rigs and where the land is flat whole circles of irrigated land is painted onto the landscape. But in places only a portion of the circle is watered because of land features and farm holding borders. Here's a link to a photograph of these amazing circles.

It's sure interesting, and I've drawn them many times but this is the first time I've ventured to paint the idea of land and crops and boundaries. Of course this isn't exactly what I saw; it's a painting of the idea of circles irrigation and how it changes the land. 

The left portion of the painting is watercolor paper and I covered the map area with pastel ground so it will accept the watercolor better. The lines are drawn with sumi ink and watercolor pencil and then misted with water to blur the boundaries, then sealed with acrylic medium and wax.

Thanks to Jill Berry for the technique which she calls "Geo Papers". Jill has written a couple of books about using maps for making art. Visit her website by clicking here:

Monday, August 03, 2015

RainForest

After several weeks away from my studio I'm back at work on some new collages and paintings in preparation for the Portland Open Studios Tour and the Washington County Studio Tour in October. While the tour is meant to be educational in nature I want to have lots of new work on my walls.

It's been hotter and drier here in Portland than I can remember in my 50-plus years as an Oregon resident. Not only is the grass brown but shrubs and trees are dying from the prolonged abnormal temperatures. Perhaps longing for rain is what drove me to think about rainforests and plentiful water, orange ponchos, and trudging along forest trails.

Here's RainForest, collage on board, 12x12".


Portland Open Studios Tour;  October 10, 11, 17, 18, 2015.
Washington Country Studio Tour: October 17 and 18, 2015.

Friday, July 03, 2015

Naming artworks

Tree and Shadow


This painting needs a name. Will you help name it, please?

Titles....
Perhaps my way of finding titles will help you. I keep a dedicated journal on my desk that's just for titles and quotations. Whenever I find a title I like, into the book it goes. I find titles everywhere, just not when I'm in the midst of painting. So where do I find titles?
  • Gallery shows. 
  • Plant catalogs. (This is where I found the title, Red Hot Mama.)
  • Song titles and musical terms.
  • Thesaurus and the dictionary.
  • Book or chapter titles.
  • Phrases taken from my Bible or other books.
  • Online galleries and websites.
  • Note the titles other artists use for their works. Titles aren't protected by copyright and this is one place I "steal like an artist". I've yet to use a title that I don't change somehow but I know the day will come and I don't call that dishonest, and I hereby give you permission to copy my titles.
How do you title your own work?

Shadow photos....
Photos of my shadow are my version of selfies and lately I've been incorporating the shadow photos in my collages, sometimes directly by gluing the photo into the composition or like this one, printed onto a paper that I intend to use in the collage.

With the proper printer setting one can print on just about anything that will feed through the printer. I've printed text onto photographs, photographs onto painted paper, and in this case I printed a photo onto a magazine page that I had manipulated with solvent. Try it yourself.

I've learned....
  • Inkjet printers don't work well for this technique. Use a laser printer or toner copier, set to black/white. Printing in color should work if you have a color laser printer. I haven't tried it since I don't have one.
  • Lessen the contrast so that the black of the ink doesn't obscure the paper. Or...
  • If you want a silhouette with strong black, then increase the black in your camera software.
  • Experiment to see what you can do.
It's all about process....
Of course much of this would be easier done digitally in your computer program, i.e. Photoshop, but I am a tactile person and I have to have my hands on the paper, the scissors, and get my fingers covered with glue. Otherwise I don't feel like I've made art. The more of me I can get into the work the better I like the process.

Monday, June 15, 2015

Orange Blossom Special

 by Jo Reimer
Orange Blossom Special


We've had such beautiful weather that I can't stay out of the garden, so with my son's expert help we have the whole garden whipped into its best shape... ever. But there was a bare spot so I bought some of those short dahlias and as I was planting them I got the idea of making a bouquet that will last longer than summer. The vase colors reference my collection of green containers.

Orange Blossom Special, 6" x 24" x 1" 
collage and acrylic on cradled panel
$350.
Orange Blossom Special, detail

Monday, May 25, 2015

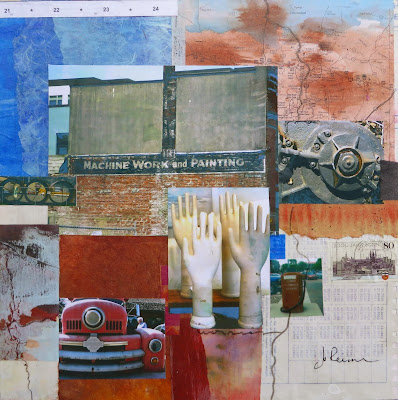
Machine Works and Painting


Machine Work and Painting
This piece named itself. 

For years I've carried a camera wherever I go and have thousands of photos of people, places, and things. And I've been trying to figure out how to combine my love of photography and my love of collage without the result looking like a scrapbook page. Perhaps I'm finally onto something that will work for me. 

This started with the photo of a warehouse stencil, Machine Work and Painting. I added maps, an old car, a collection of hands taken in a favorite store, a machine part from who knows where, and a row of big steel tubes, plus bright color, black and white, painted paper, and the drawn line.  All combined on a 12x12" board.

The best thing about this for me is that this piece pulled me up out of a fallow time when I simply didn't want to work. I've been sewing and gardening, cooking and reading, but no drawing, no painting, no collage. It was starting to bother me even though I knew it was all related to hanging the show in Hillsboro and needing a new focus.  This idea came at just the right time, thank you, Jesus.

I've been accepted into the Portland Open Studios Tour the second and third weekend in October and now that I have a new idea and a new goal of making new work for the tour I'm ready to spend lots of days in the studio. A dear friend gifted me with several dozen cradled panels and another friend cut me lots of flat panels so I know what sizes and surfaces I'll be working on. The next step is to dig out a bunch of photos from the boxes stacked in the corner and see what works with what.

I spent a lot of time in Hong Kong in the 80s and photos from those trips will make some interesting collages, as will photos from various road trips and vacations.

Watch this space for new work! I'm on a roll.


Saturday, May 09, 2015

New PAGE added to my blog


I've just added a PAGE to my blog titled Hillsboro Exhibit. See it at the top, right under the title, One A Day. I'm gradually adding images of all the paintings that are in the Hillsboro show, along with sizes and prices. 


I'm so grateful to my helpers Constance Adams and Jill Getzendaner (my daughter) who made it possible to hang the show in one long afternoon. The library has a slick professional hanging system of wires and hooks but still, it was a chore. I came away absolutely convinced of the the worth of paying a hefty commission to a gallery which takes on the chore of hanging your work and putting it before qualified buyers. The library doesn't do all that; I do, if it's to be done.


The reception is next Saturday, May 16, from 2-4 and I hope to see many of you there, but you can go see the work anytime the library is open during the months of May and June. If you'd like me to meet you there, just call or email.


I had 39 pieces from which to choose and we wound up with 32. I was quite disappointed to get home and find 4 paintings under some towels in my front seat, 3 of which I really wanted in the show, including the one I used for my show card. And later I realized that I didn't make it home with my little bag of tools. I'll bet I left it sitting in the parking lot when I packed up the boxes to go home. Oh well, someone else now has a handy awl, level, and screwdriver. When you get old you forget things.

Wednesday, April 29, 2015

sometimes there's a better way

While gathering completed works for the Hillsboro library show I put my hand on a collage that needed help. I liked the concept and most of the details but the design of the flower and the title weren't right.
Red Flower
So I fixed it. And changed it's name. Now I like it.
Red Hot Mama
Jo Reimer's collages will be shown at the Hillsboro Main Library, 2850 NE Brookwood Pkwy, Hillsboro, OR 97124 throughout the months of May and June during library hours. You're invited to an artists reception in the Board Room on the second floor, Saturday May 16 between 2 and 4.
Related Posts Plugin for WordPress, Blogger...